docker-compose instructions
The docker-compose.yml builds and starts all the needed applications and targets on a single host running docker.
Keep in mind that this may require a lot of memory to run (our tests are performed on systems with at least 8GB ram).
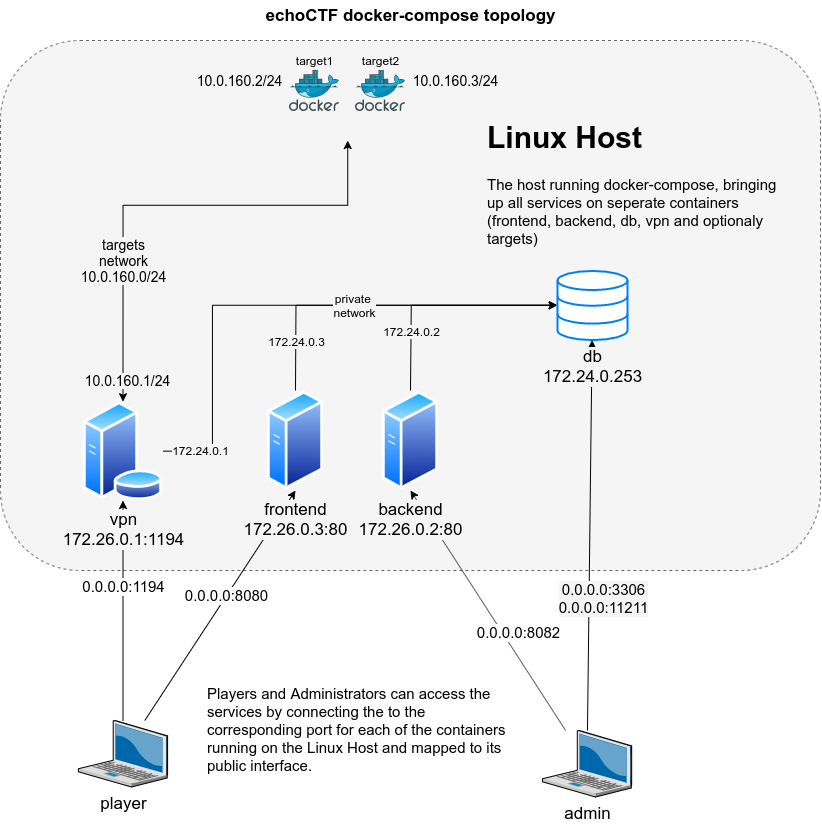
The docker containers use the following networks ranges
echoctfred_public:172.26.0.0/24(also a docker network)echoctfred_private:172.24.0.0/24(also a docker network)echoctfred_targets:10.0.160.0/24(also a docker network)OpenVPN:10.10.0.0/16(only availabe from with vpn and openvpn)
Furthermore the following ports are mapped on the host server and containers by uncommenting the ports section in the docker-compose.yml file (use it at your own risk!)
- udp 0.0.0.0:1194 => echoctfred_vpn 172.26.0.1:1194 openvpn
- tcp 0.0.0.0:8082 => echoctfred_backend 172.26.0.2:80
- tcp 0.0.0.0:8080 => echoctfred_frontend 172.26.0.3:80
- tcp 0.0.0.0:3306 => echoctfred_db 172.24.0.253:3306
- tcp 0.0.0.0:11211 => echoctfred_db 172.24.0.253:11211
The following volumes are configured and used
echoctfred_data-mysqlFor persistent mysql dataechoctfred_data-openvpnFor persistent openvpn dataechoctfred_data-challengesunder backend & frontend/var/www/echoCTF.RED/*/web/uploadsfrontend/web/imagesunder/var/www/echoCTF.RED/frontend/web/imagesfor frontend logos and imagesbackend/web/imagesunder/var/www/echoCTF.RED/backend/web/imagesfor backend logos and images
You can modify the volumes and port mappings by editing the corresponding values in the docker-compose.yml file.
The following diagram illustrates the docker networks and containers that are configured by docker-compose.yml.
Starting up
The easy way to start is to use the official docker images and starting them up by executing.
docker-compose pull
chmod a+rw frontend/web/images/{avatars,avatars/badges,targets}
docker-compose up
The first time you run docker-compose up give the containers a few minutes to complete the startup process, it takes a couple of minutes for the process to complete so be patient.
Once the initialization process completes, run the following command to connect the mysql server with the memcached
docker exec -it echoctfred_db bash -c "mariadb < /etc/mysql-init.sql"
This command will have to be run every time the database server stops or respawned by eg docker-compose down and only once the systems are fully initialized. You can make the change permanent by appending , "--init_file=/etc/mysql-init.sql" to the db command parameters before the closing bracket ].
command: ["mysqld","--character-set-server=utf8mb4", "--collation-server=utf8mb4_unicode_ci","--skip-character-set-client-handshake", "--init_file=/etc/mysql-init.sql"]
If you’d rather to build your own images make you sure you generate a Github OAuth Token to
be used by the composer utility. This is needed in order to avoid hitting
Github rate limits on their API, which is used by composer. More information
about generating a token to use can be found @Creating a personal access token for the command line
Once you’ve generated your token you can build the images and start them up by executing
composer config -g github-oauth.github.com "MY_TOKEN_HERE"
cd backend
composer install --no-dev --prefer-dist --no-progress --no-suggest
cd ../frontend
composer install --no-dev --prefer-dist --no-progress --no-suggest
cd ..
docker-compose build
docker-compose up
1st time configuration
Configure mail address for player registrations
docker exec -it echoctfred_vpn ./backend/yii sysconfig/set mail_from dontreply@example.red
Create backend and frontend users to test
docker exec -it echoctfred_vpn ./backend/yii user/create username email@example.com password
docker exec -it echoctfred_vpn ./backend/yii player/register username email@example.com fullname password offense 1
The syntax for the commands can be found at Console-Commands.md
Set the IP or FQDN for the VPN server that participants will have to connect through openvpn. This is the IP address or FQDN that the VPN server will be accesible to the participants. This IP or FQDN is also used inside the auto-generated VPN connection pack that the players use to connect to the VPN and access the targets.
docker exec -it echoctfred_vpn ./backend/yii sysconfig/set vpngw 172.26.0.1
# or
docker exec -it echoctfred_vpn ./backend/yii sysconfig/set vpngw vpn.example.com
Set the IP of FQDN for the other accessible services (frontend, backend)
docker exec -it echoctfred_vpn ./backend/yii sysconfig/set offense_domain 172.26.0.3
docker exec -it echoctfred_vpn ./backend/yii sysconfig/set moderator_domain 172.26.0.2
# or
docker exec -it echoctfred_vpn ./backend/yii sysconfig/set offense_domain players.example.com
docker exec -it echoctfred_vpn ./backend/yii sysconfig/set moderator_domain moderators.example.com
Log into the backend with the user you created, go to Settings => Configure and configure the rest of the parameters for your installation, such as event name, start/stop dates etc.
Ensure that the docker containers can communicate with the participants. Once the echoctfred_vpn host is up run this on the host you run docker-compose at.
sudo route add -net 10.10.0.0/16 gw 10.0.160.253
You can also manipulate a particular container routing table by following the
example below. However keep in mind that this route will be deleted when the
container restarts, so the command above route add -net, is preferred.
pid=$(docker inspect -f '{{.State.Pid}}' echoctfred_target1)
sudo mkdir -p /var/run/netns
sudo ln -s /proc/$pid/ns/net /var/run/netns/$pid
sudo ip netns exec $pid ip route del default
sudo ip netns exec $pid ip route add default via 10.0.160.253
Make sure you configure the host dockerd daemon to have its API listen to the new private network.
However since the network becomes available only after dockerd starts you will have to bind to 0.0.0.0 (ie -H tcp://0.0.0.0:2376)
For more information about enabling Docker API remote access
Make sure you restrict connections to the dockerd port to only these containers echoctfred_vpn/172.24.0.1 and echoctfred_backend/172.24.0.2.
Your frontend is accessible at http://172.26.0.3/
Login to the backend http://172.26.0.2/ and add a target with the following details
- Name:
echoctfred_target1 - FQDN:
echoctfred_target1.example.com - Status:
online - Scheduled at: empty
- Difficulty:
0 - Active: ✓
- Rootable: ✓
- Suggested XP: 0
- Required XP: 0
- Purpose:
this will appear when participants tweet about targets - Description:
this will be displayed to participants on the frontend - IP Address:
10.0.160.100Same astarget1entry fromdocker-compose.yml - MAC Address:
02:42:0a:00:a0:02 - Dns:
8.8.8.8 - Net:
echoctfred_targets - Server:
tcp://172.24.0.254:2376 - Image:
nginx:latest - Parameters (optional):
{"hostConfig":{"Memory":"512"}}
Once the target is created, click the Spin button on top to start it up. If everything is correct you should be able to see the container running
docker inspect echoctfred_target1
Keep in mind that you will have to configure firewall rules in order to limit or restrict who can access the target containers as well as what the target containers will be allowed to access. Keep in mind that these targets are meant to be hacked, so take care at limiting their network access with iptables.