docker-compose with separate VPN server
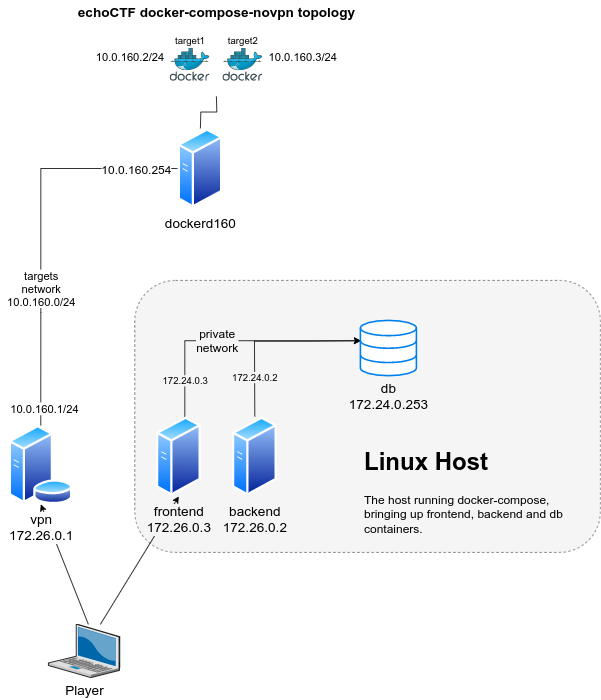
The following guide will provide instructions on running the backend, fronend, and db from docker-compose along with separate servers for VPN and docker targets as can be seen on the diagram below.
In this guide the infrastructure assumes a separate servers/vms. The servers described are as following:
-
Linux Host: The linux host that the
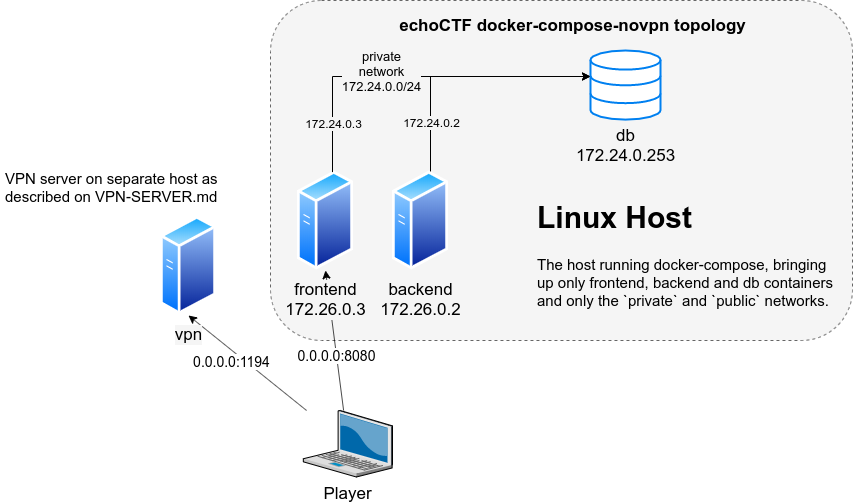
docker-composecommand will run on. The filedocker-compose-novpn.ymlbuilds and starts containers forfrontend,backendanddbon a Linux host as can be seen on the diagram below. -
VPN Host: An OpenBSD gateway host for VPN and docker servers and target containers configured following the instructions from VPN Server Installation.
-
Docker Server: A linux debian host (dockerd160 on the diagram above) that we will utilize as docker API server and that the actual target containers will run on (target1 and target2 on the diagram above).
The following networks are used throughout the document
echoctfred_public:172.26.0.0/24echoctfred_private:172.24.0.0/24echoctfred_targets:10.0.160.0/24OpenVPN:10.10.0.0/16
Furthermore the following ports are mapped on the host server and containers
- tcp 0.0.0.0:8082 => echoctfred_backend 172.26.0.2:80
- tcp 0.0.0.0:8080 => echoctfred_frontend 172.26.0.3:80
- tcp 0.0.0.0:3306 => echoctfred_db 172.24.0.253:3306
- tcp 0.0.0.0:11211 => echoctfred_db 172.24.0.253:11211
The following volumes are configured and used
echoctfred_data-mysqlFor persistent mysql dataechoctfred_data-challengesunder backend & frontend/var/www/echoCTF.RED/*/web/uploads./themes/imagesunder/var/www/echoCTF.RED/*/web/imagesfor logos and images
Pull the official images for the applications
docker-compose -f docker-compose-novpn.yml pull
If you prefer to build your images you will have to generate a Github OAuth Token to be used by the composer utility.
This is only needed once and we do it in order to avoid hitting Github rate limits on their API, which is used by composer.
More information about generating a token to use can be found at Creating a personal access token for the command line
Once you’ve generated your token you can build the images.
Keep in mind that this may require a lot of memory to run (our tests are performed on systems with at least 8GB ram).
composer config -g github-oauth.github.com "MY_TOKEN_HERE"
cd backend
composer install --no-dev --prefer-dist --no-progress --no-suggest
cd ../frontend
composer install --no-dev --prefer-dist --no-progress --no-suggest
cd ..
docker-compose -f docker-compose-novpn.yml build
From this point on the installation deviated depending on whether or not you want to have a dedicated ethernet interface for the private network, used for communication between vpn and db.
Communication through docker exported ports
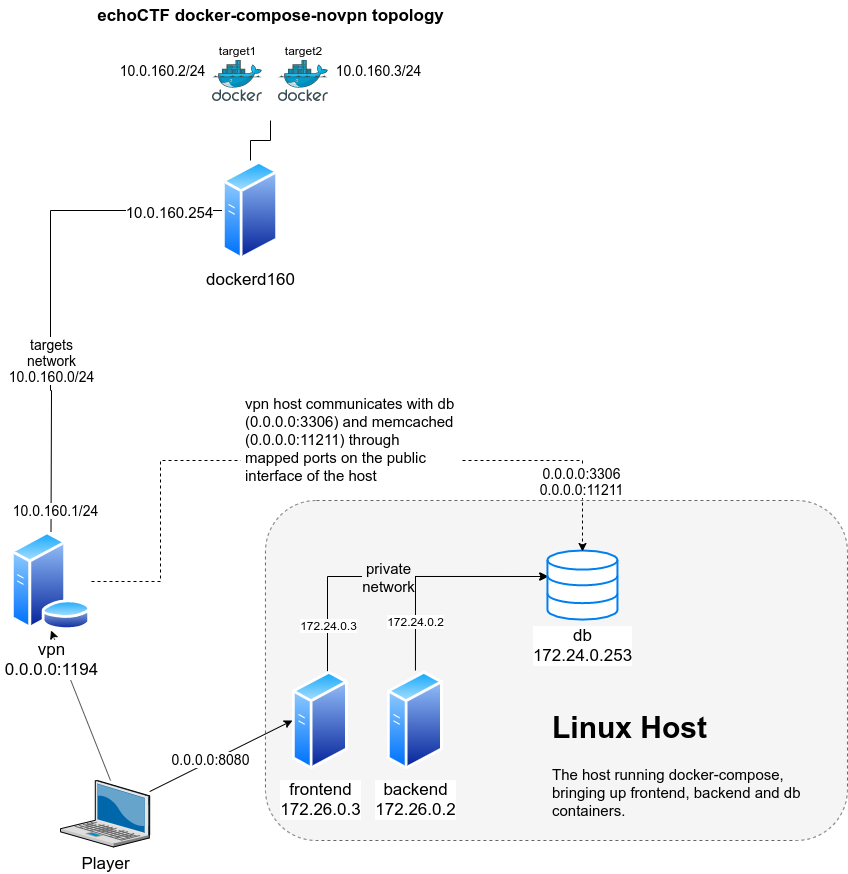
Start the containers on the Linux Host to bring up frontend, backend and db containers (as illustrated on the diagram below).
docker-compose -f docker-compose-novpn.yml up
# or start in detached mode
docker-compose -f docker-compose-novpn.yml up -d
Perform the needed migrations and initialize needed application data
docker exec -it echoctfred_backend ./backend/yii migrate --interactive=0
docker exec -it echoctfred_backend ./backend/yii init_data --interactive=0
docker exec -it echoctfred_backend ./backend/yii migrate-sales --interactive=0
docker exec -it echoctfred_backend ./backend/yii template/emails
Create a backend user
# backend user
docker exec -it echoctfred_backend ./backend/yii user/create username email password
Login to the backend and go to Settings=>Configure to complete your system configuration. Once you are done configuring the system you can continue with the following steps.
Create SSL certificates to be used for new players (REQUIRES CONFIGURED SYSTEM)
docker exec -it echoctfred_backend ./backend/yii ssl/create-ca
docker exec -it echoctfred_backend ./backend/yii ssl/create-cert
Follow the instructions from VPN Server Installation and adapt your values accordingly.
Follow the instructions from DOCKER-SERVERS.md to prepare your docker api server (dockerd160).
If you followed the instructions correctly your network topology should look like the diagram.
The Linux Host backend will need to be able to access the Docker API
Servers behind the vpn server. For this reason we will have to add a network
route for the network 10.0.160.0/24 on the Linux Host by executing
route add -net 10.0.160.0/24 gw <vpn_public_ip>
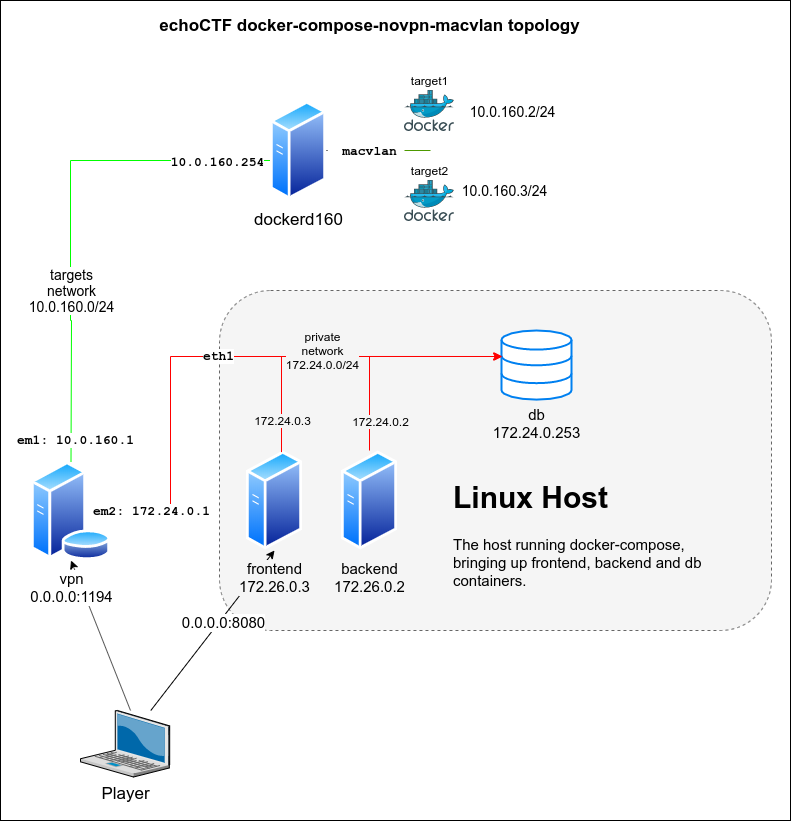
Dedicated ethernet interface for private network
There is also an alternative setup for providing a dedicated network interface
for the private network private (color red). This involves the addition of an
extra ethernet adapter on both vpn and linux host.
Ensure that all containers are stopped by running the following from the Linux Host
docker-compose -f docker-compose-novpn.yml down
Decide what is the network interface you will dedicate for the private
network (enp0s8 in our example) and configure accordingly. We assign an IP
to the interface (172.24.0.252 and place it on promiscuous mode to be able to
process packets), edit /etc/network/interfaces and add something like the
following
auto enp0s8
iface enp0s8 inet static
 address 172.24.0.252/24
 up ifconfig $IFACE promisc
Restart networking and start the containers up using the docker-compose-novpn-macvlan.yml
PRIVATE_PARENT_INTERFACE=enp0s8 docker-compose -f docker-compose-novpn-macvlan.yml up
# or
export PRIVATE_PARENT_INTERFACE=enp0s8
docker-compose -f docker-compose-novpn-macvlan.yml up
Add an additional ethernet adapter to the VPN host (em2 in our case). Once added, configure the interface by running the following commands from the vpn server
echo "inet 172.24.0.1 255.255.255.0 NONE group private">/etc/hostname.em2
sh /etc/netstart em2
Ensure the link is up and you can connect to the database host from the vpn
ping -c 1 172.24.0.252 # the Linux Host IP
ping -c 1 172.24.0.253 # the echoctfred_db container
mysql -uvpnuser -pvpnuserpass -h 172.24.0.253 -e "SELECT user();" echoCTF
Re-run the ansible/runonce/vpngw.yml playbook on your vpn server and
make sure you use the internal IP for the database server.
If you are using virtual machines make sure that you allow promiscuous mode to the interface you dedicate for the macvlan bridge.
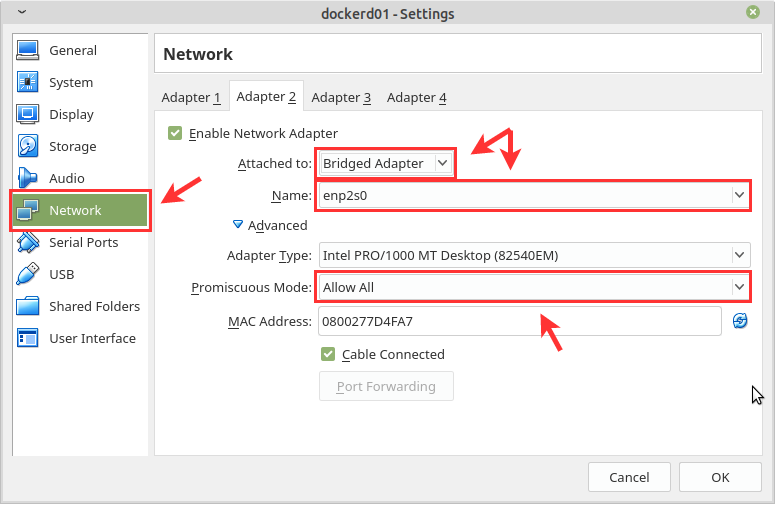
And this is how it looks for vSphere
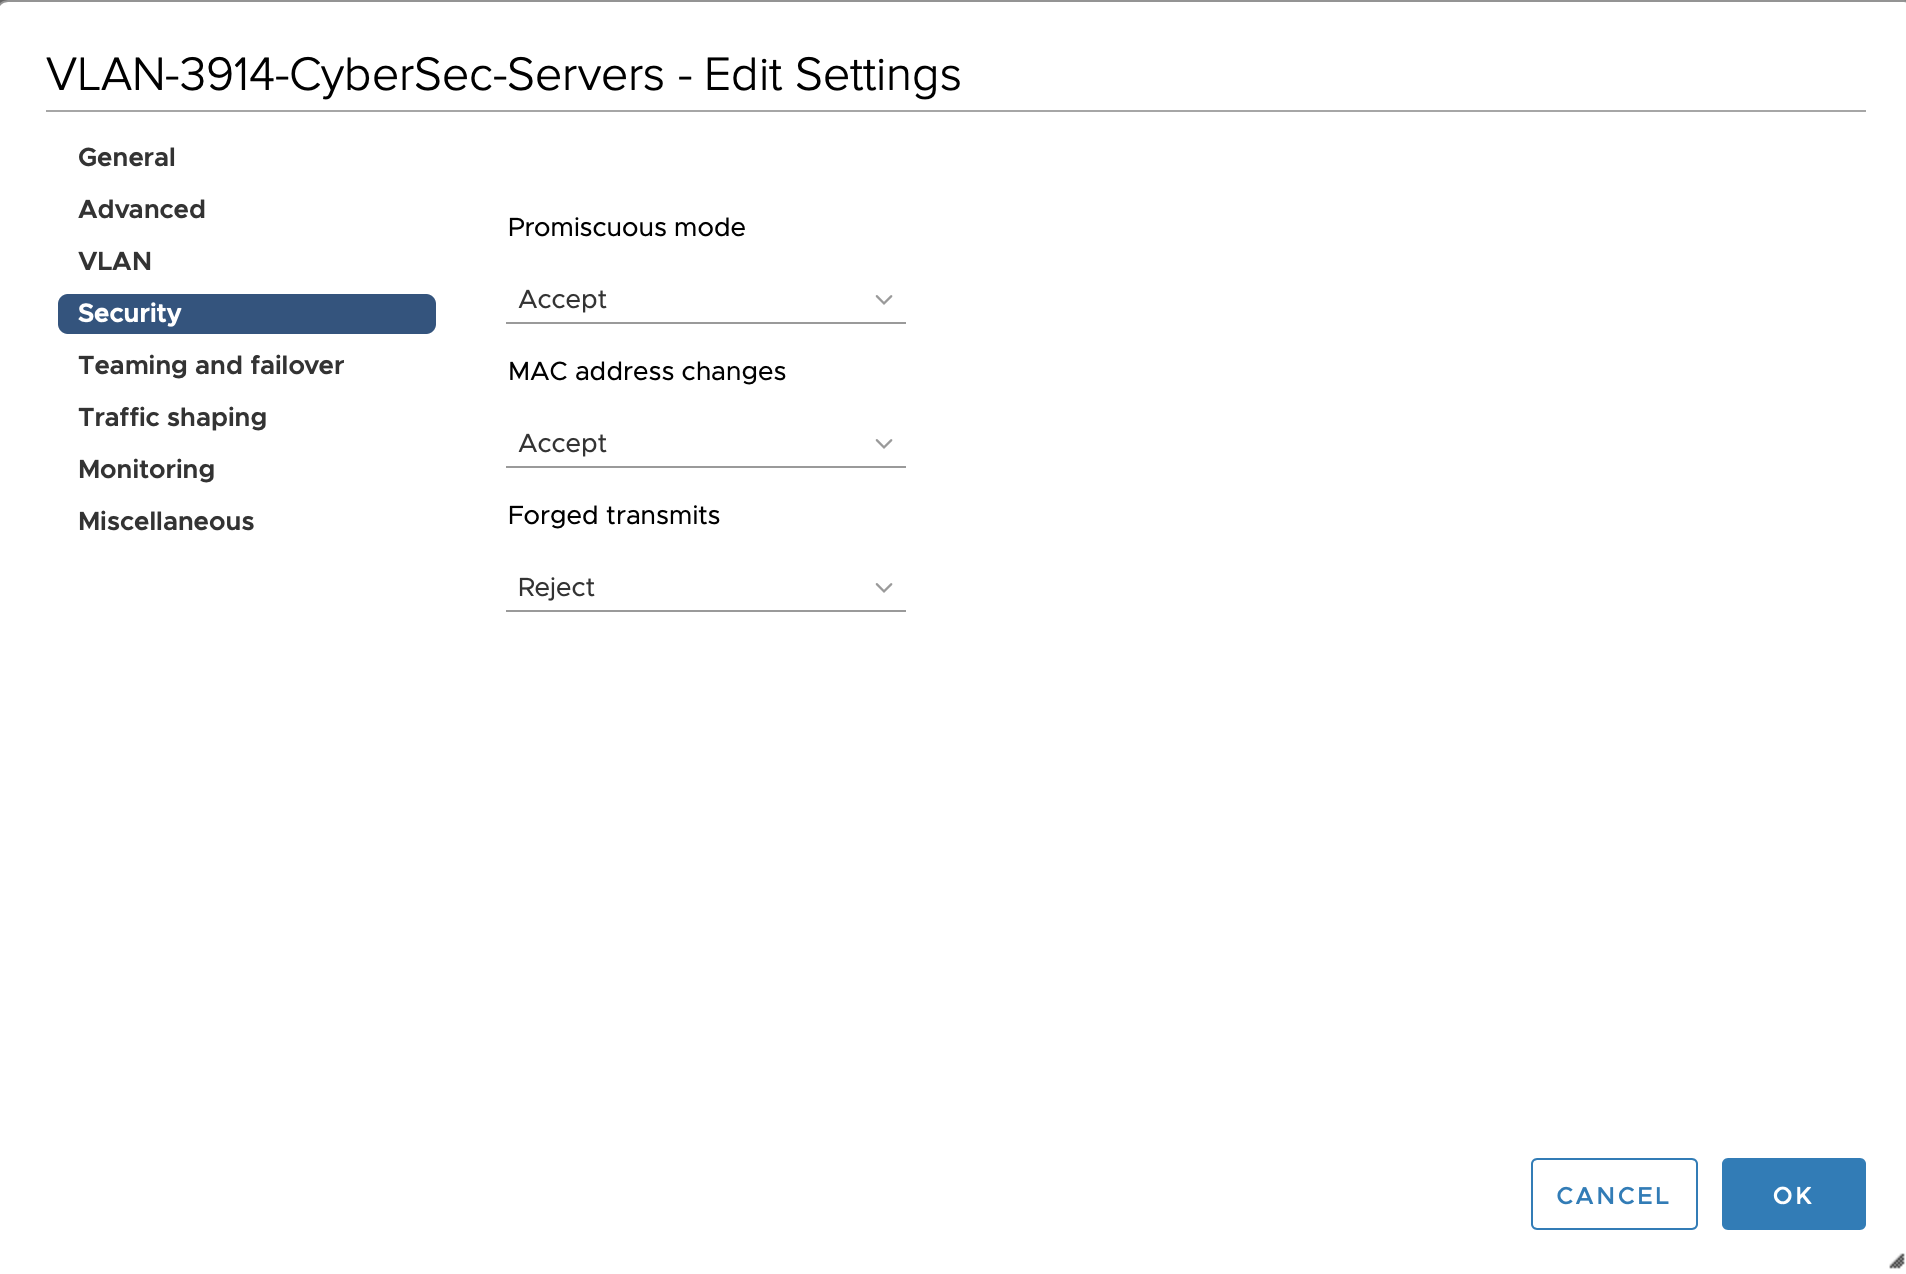
For VMware related options you can look at the following link Configuring promiscuous mode on a virtual switch or portgroup (1004099)